
:: Configuring a Client / Repeater in DD-WRT ::
It has been written as clearly as possible while making the following assumptions :
  (1) You already have a router with DD-WRT installed.
  (2) You have an existing wireless network to connect to.
  (3) You have the security information required to connect to your existing network (password & encryption type).
  (4) Your existing network assigns IP addresses via DHCP (If you're not sure then it probably does).
In this example we will be configuring a "client" setup which will perform multiple functions including extending the range of your existing wireless network and acting as a "wireless-card" for non-wireless devices.
If you prefer to use the "repeater" setting it will work as well. The steps are the very same and will provide the same results.
The steps outlined in this guide involve resetting your dd-wrt to factory conditions so do not attempt this if you are not comfortable with resetting your dd-wrt router.
Please read through the entire guide at least once before attempting to configure your router.
If you've tried and failed or require help with a specific section you can request assistance on the PEI Tech Support group on Facebook.
The guide has been divided into 4 sections :
        (1) Resetting the router                      (3) Connecting to your existing network
        (2) Setting the IP & login information        (4) Configuring your new wireless sub-network
Complete each step in sequence to ensure a successful configuration. Each task provides a link to a screenshot for visual aid.If you do not wish to broadcast a wireless signal for your new sub-network you can skip the final step (Configuring your new wireless sub-network).
While completing these steps - your PC should be connected to one of the LAN ports on your dd-wrt router. The only other wire that should be connected to the dd-wrt router is the power wire. There should be no other devices connected and nothing connected to the WAN port.
• Press and hold the RESET button on the router for 60 seconds.
• On your PC, open a web-browser and go to 192.168.1.1 figure 1-A
• Create a username/password to log into your router. Write this info down! figure 1-B
• Click "Change Password". figure 1-C
• Select the "Setup" tab. figure 2-A
• Set the "Connection Type" to "Automatic Configuration - DHCP". figure 2-B
• Scroll down to the "Network Setup > Router IP" section and assign the following values : figure 3-A
	  Local IP Address : 192.168.9.1
	  Subnet Mask      : 255.255.255.0
	  Gateway          : 0.0.0.0
	  Local DNS        : 0.0.0.0
• Scroll to the bottom and click "SAVE". Do NOT click the apply settings button. figure 4-A


If this is the case, try changing wireless security settings to confirm they match (WPA vs WPA2 for example).
If you are still unable to establish a connection then you can try temporarily disabling the wireless security on your existing network. This will help confirm whether or not it is a security setting issue.
• Scroll back to the top and select the "Wireless" tab. figure 5-A
• Change the "Wireless Mode" to "Client" or "Repeater". Either will work. figure 5-B
• Click "Save". figure 5-C
• Select the "Status" tab. figure 6-A
• Select the "Wireless" sub-tab. (not the first/top wireless tab). figure 6-B
• Scroll to the bottom of the page and select "Site Survey". figure 6-C
• In the window that pops up - locate the name of your existing wireless network and select the "Join" button beside it. figure 7-A
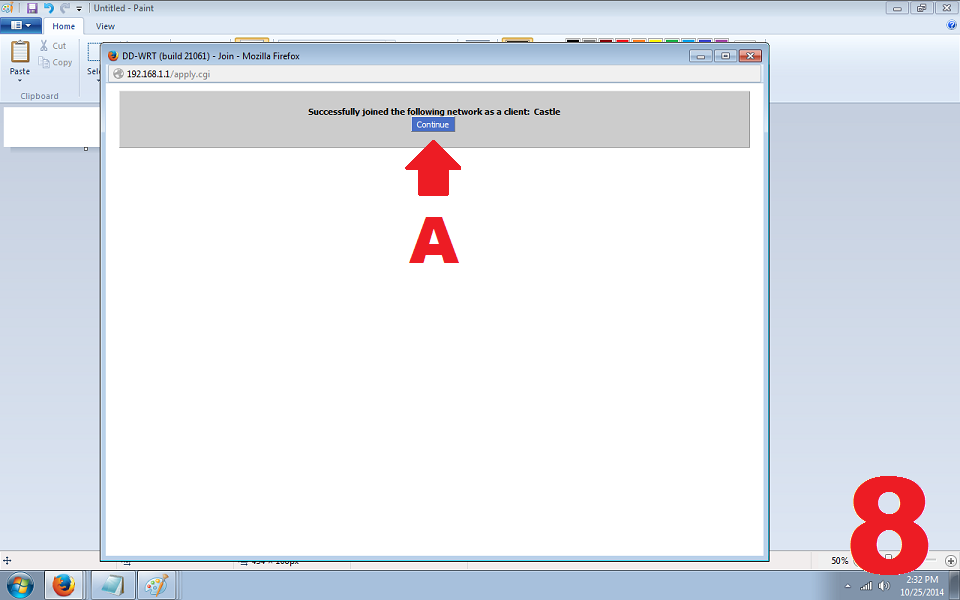
• Click the "Continue" button in the follow screen. This will close the window and bring you back to the "Wireless" section. figure 8-A
• Click "Save". figure 9-A
• Select the "Wireless Security" sub-tab. figure 10-A
• Change the security mode to match your existing wireless configuration. figure 10-B
• Enter your existing wireless password/key into the provided box. Use the "unmask" box to confirm that it was entered correctly. figure 10-C
• Click "Save" then wait for a few seconds and click "Apply". This will restart the router.figure 10-D / E


At this point your dd-wrt router should be configured to connect to your existing network.
If your dd-wrt router interface shows a valid WAN IP in the top-right corner then it is properly configured. If not - you can try restarting your router or checking the settings used in the previous steps.
This section is not necessary if you do not wish to broadcast a new wireless signal. Your dd-wrt router has already been configured to act as a client and will share your existing wireless network connection through the LAN (ethernet) ports of your dd-wrt router.
Since we've clicked the 'Apply' button in the previous step - your dd-wrt router will now be using the new IP scheme and will require you to enter the new IP address into your address bar to access the router's interface.
If entering the new IP (192.168.9.1) into your address bar does not load the router interface then it is possible that your PC is still using the old IP.
To fix this simply disconnect the dd-wrt router from your PC for 30 seconds then re-connect it. This should cause your PC to acquire a new IP address.
• Enter 192.168.9.1 into your address bar and hit 'enter' on the keyboard. figure 11-A
• Look in the top-right corner of the screen for your WAN IP address. Confirm that it has been assigned successfully. figure 11-B
• Select the "Wireless" tab. figure 12-A
• Click "Add". figure 12-B
• Create a name for your new network. figure 13-A
• Click "Save". figure 13-B
• Select the "Wireless Security" sub-tab. figure 14-A
• Select a security mode. (Recommended : WPA Personal > TKIP) figure 14-B
• Create a password / key for your new network. figure 14-C
• Click "Save" then wait for a few seconds and click "Apply". figure 14-D / E


